1. 畫面顯示旋轉
1.1 更新作業系統版本
1.1.1 檢查作業系統版本,輸入以下指令
cat /etc/os-release輸出如下:
PRETTY_NAME="Raspbian GNU/Linux 10 (buster)"
NAME="Raspbian GNU/Linux"
VERSION_ID="10"
VERSION="10 (buster)"
VERSION_CODENAME=buster
ID=raspbian
ID_LIKE=debian
HOME_URL="http://www.raspbian.org/"
SUPPORT_URL="http://www.raspbian.org/RaspbianForums"
BUG_REPORT_URL="http://www.raspbian.org/RaspbianBugs"
1.1.2 若作業系統是 Raspberry Pi OS Bullseye 分支版本,則需要更新,執行以下指令,其他系統不需要,可以跳過。
sudo apt-get update
sudo apt-get full-upgrade
1.2 Raspberry Pi OS 和 Kali 畫面顯示旋轉
先檢查系統是否有加載 KMS 或 FKMS 驅動。
查看方法:在 /boot/config.txt 中,看對應的主板是否有打開 dtoverlay=vc4-kms-v3d 或 dtoverlay=vc4-fkms-v3d。
1.2.1 若有加載 KMS 或 FKMS 驅動,使用以下命令進行畫面顯示旋轉:
sudo nano /etc/xdg/lxsession/LXDE-pi/autostart在 autostart 檔案尾端輸入對應顯示旋轉角度的指令如下,重啟後生效
0:旋轉0度
1:旋轉270度
2:旋轉180度
3:旋轉90度
xrandr -o 11.2.2 若没有加載 KMS 或 FKMS 驅動,使用以下命令進行畫面顯示旋轉:
sudo nano /boot/config.txt在 config.txt 檔案尾端輸入對應顯示旋轉角度的指令如下,重啟後生效
0:旋轉0度
1:旋轉90度
2:旋轉180度
3:旋轉270度
display_rotate=32. 觸控旋轉
2.1 安裝 libinput
sudo apt-get install xserver-xorg-input-libinput如果你安裝的是 Ubuntu 系統,或是 Jetson Nano,安裝指令如下,
sudo apt install xserver-xorg-input-synaptics2.2 在 /etc/X11/ 下建立 xorg.conf.d 資料夾(若該資料夾已存在,此步驟可跳過)
sudo mkdir /etc/X11/xorg.conf.d2.3 複製 40-libinput-conf 檔案到剛建立的資料夾底下
sudo cp /usr/share/X11/xorg.conf.d/40-libinput.conf /etc/X11/xorg.conf.d/2.4 編輯該檔案
sudo nano /etc/X11/xorg.conf.d/40-libinput.conf2.5 找到 touchscreen 的部分,在裡面增加以下指令,然後存檔即可
Option "CalibrationMatrix" "0 1 0 -1 0 1 0 0 1"類似下圖位置:
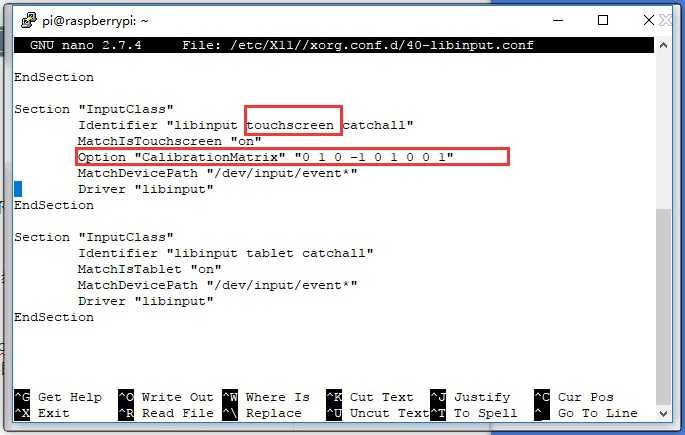
2.6 重啟樹莓派
sudo reboot完成以上步驟即可進行 90 度旋轉。
備註:
90 度旋轉: Option “CalibrationMatrix” “0 1 0 -1 0 1 0 0 1”
180 度旋轉: Option “CalibrationMatrix” “-1 0 1 0 -1 1 0 0 1”
270 度旋轉: Option “CalibrationMatrix” “0 -1 1 1 0 0 0 0 1”